All The Small Things – Christmas Nature Crafts
This year’s Christmas craft blog is all about the small things – ornaments, gift tags and snow globes, using a variety of natural materials, and many of the craft items you may already have around the house.
And as always, our craft ideas are perfect for children of all ages, with even very small children able to take part in creating some wonderful Christmas memories!
Ornaments
The family Christmas tree is always in need of more adornments, and what better way to trim the tree than with gorgeous home made pieces to spark conversation, and build memories to be cherished for years to come?
Gum Nut Ornaments
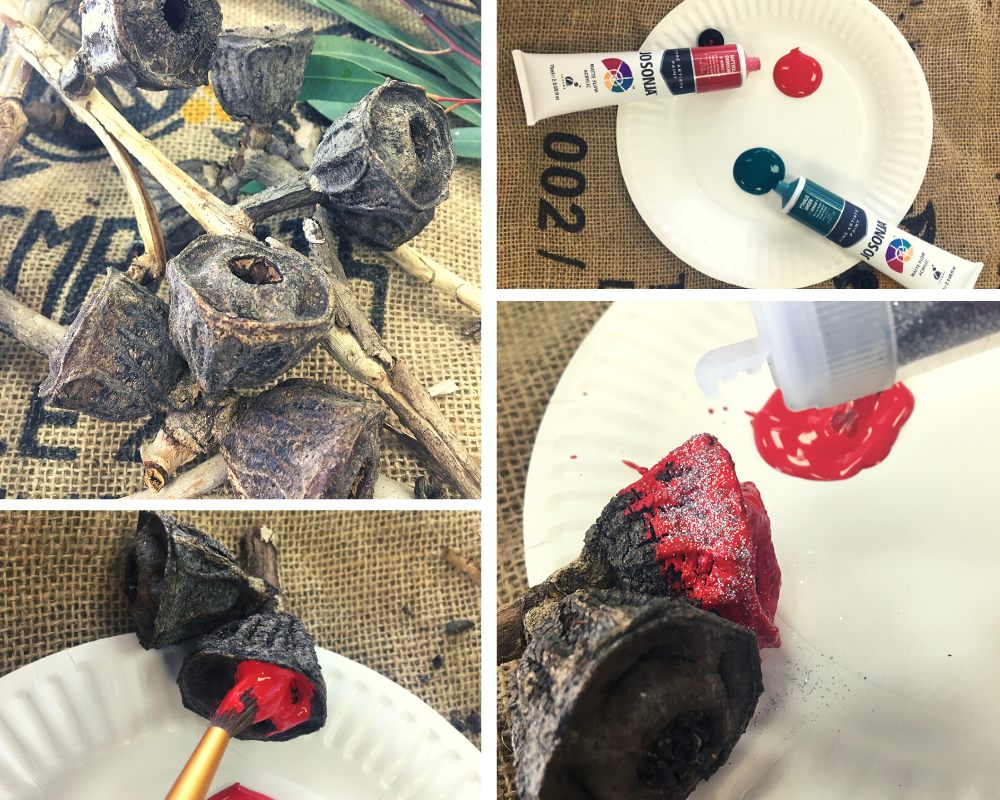
Materials:
- Gum nuts
- Brightly coloured paint (we used Jo Sonja Acrylics, but you can use any craft paint you have available)
- Glitter (optional)
- Cord/string (for hanging ornaments)
Method:
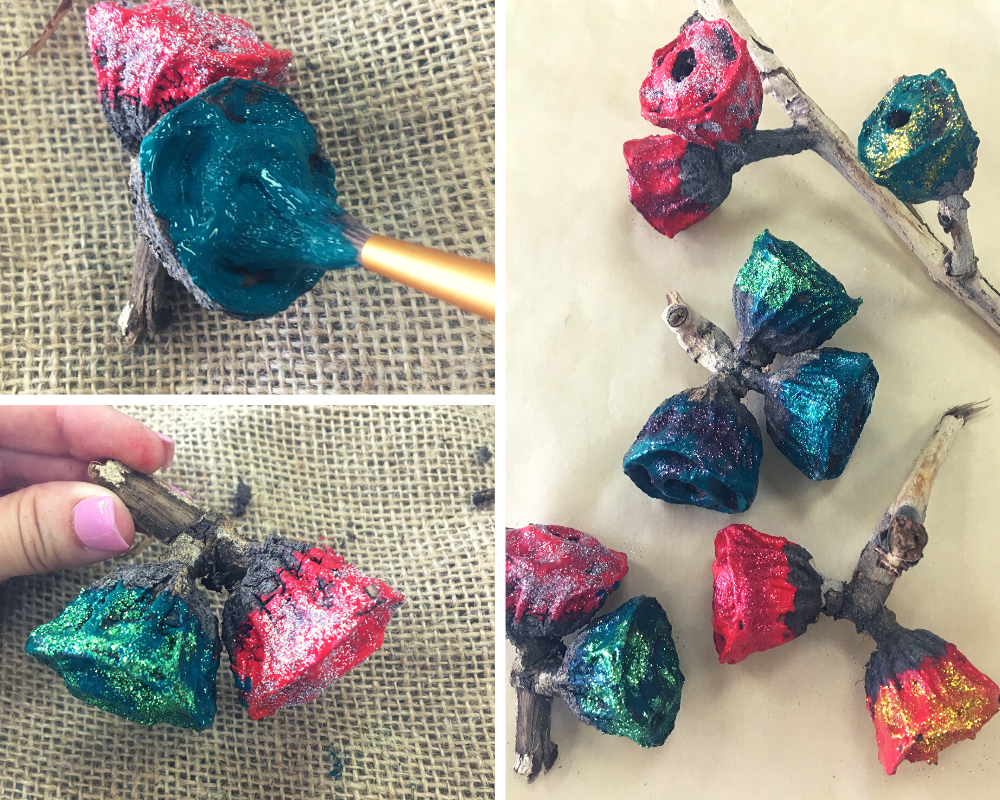
A quick trip around your neighbourhood or park will usually yield a fallen branch or two, with gum nuts of many different types to discover. Or perhaps you have a treasure trove collected during nature walks throughout the year. With these ones, we decided to paint the tips and part way up the nut, leaving the tops their natural colour. You can either paint them with a paintbrush, or dip them in pots of paint to get the effect you prefer. We then sprinkled glitter over the wet paint to add a little bling, but we think they also look lovely with just a spot of paint.
Attach string to each to make individual ornaments, or string a selection of them along a small branch for a larger hanging piece. We used bamboo cord for our ornaments, as it grips well when knotted, so won’t slip when tying.

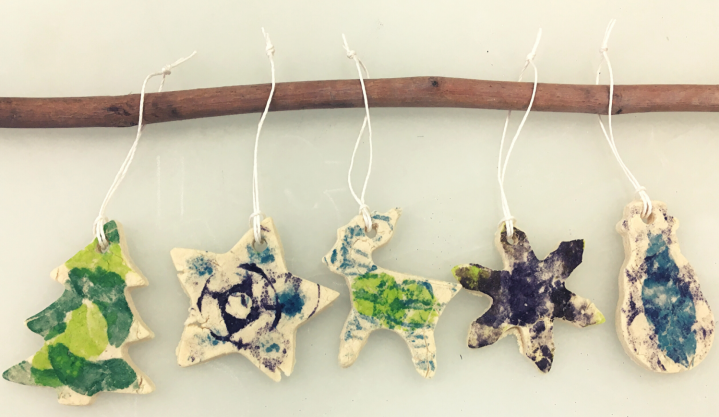
Salt Dough Ornaments
Salt dough is a great medium to work with, as it’s easy to whip up a batch, and it’s slow drying, which means small people who need a little more time with their designs don’t have to rush. We left our batch plain coloured, but you can add food colouring to add another element to your creations.
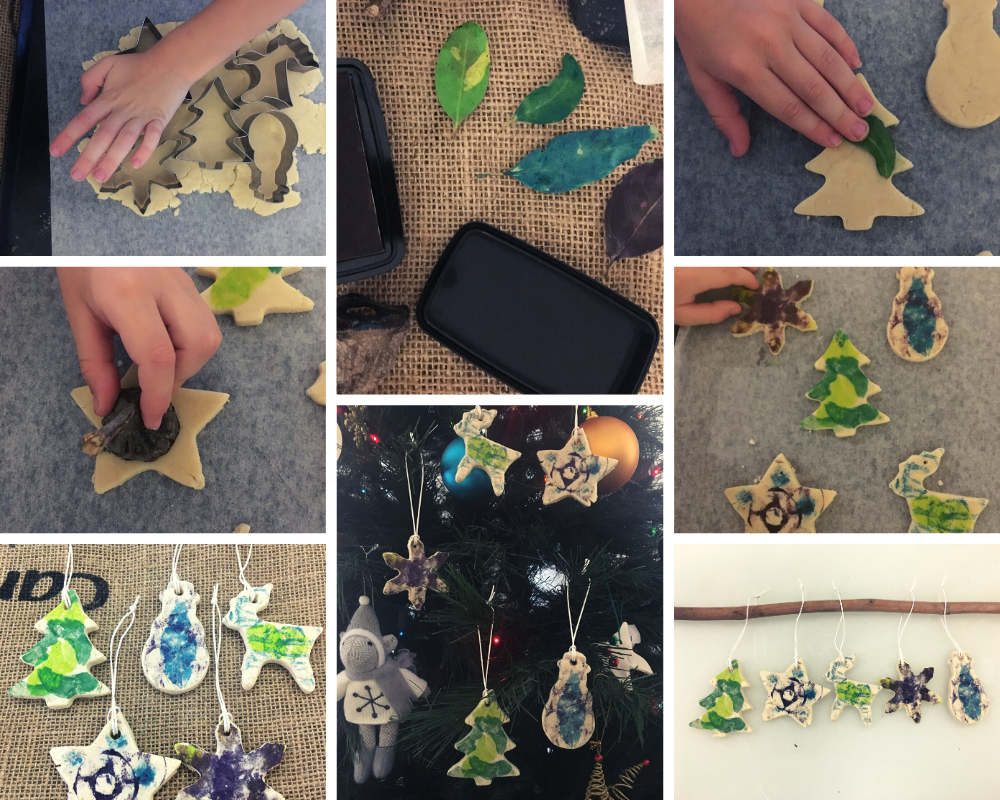
For our ornaments we used cookie cutters to form our shapes, with natural materials (leaves/sticks/flowers) and ink pads to print onto the dough. You could also press natural materials into the dough and air dry the final product, but as we oven baked ours, we went with the print-making method.
By sure to use a kitchen skewer or carving fork to pierce a hole in the top of your ornament before you bake or dry your creations, to enable threading of string through for hanging your ornament.
Salt dough recipe
We use the Taste.com Salt Dough Recipe, as this is one we’ve used regularly, and always results in a great end product.
Ingredients:
- 1 1/2 cups plain flour
- 1/2 cup fine table salt
- 1 tablespoon vegetable oil
- 2/3 cup chilled water
Method:
Step 1 – Preheat oven to 120°C. Line 2 baking trays with baking paper. Mix flour and salt in a bowl. Make a well in the centre. Pour in oil. Gradually add water, stirring mixture with a wooden spoon until combined. Turn dough onto a lightly floured surface. Knead to make a smooth ball.
Step 2 – Roll dough out between 2 sheets baking paper until 7mm thick. Use Christmas-shaped cutters to cut out decorations (this is the point where we created our nature prints in our decorations). Use a chopstick or skewer to make a hole at the top of each decoration. Place decorations on trays. Roll remaining dough together and repeat.
Step 3 – Bake decorations for 2 1/2 hours or until firm and dry. Transfer to a wire rack to cool completely.
Step 4 – Paint front and sides (if desired. We left ours as is.) . Allow paint to dry. Paint a second coat. While top coat is wet, sprinkle with glitter. Allow to dry. Paint back of decorations with 2 coats. Thread ribbon through holes. Hang on Christmas tree.
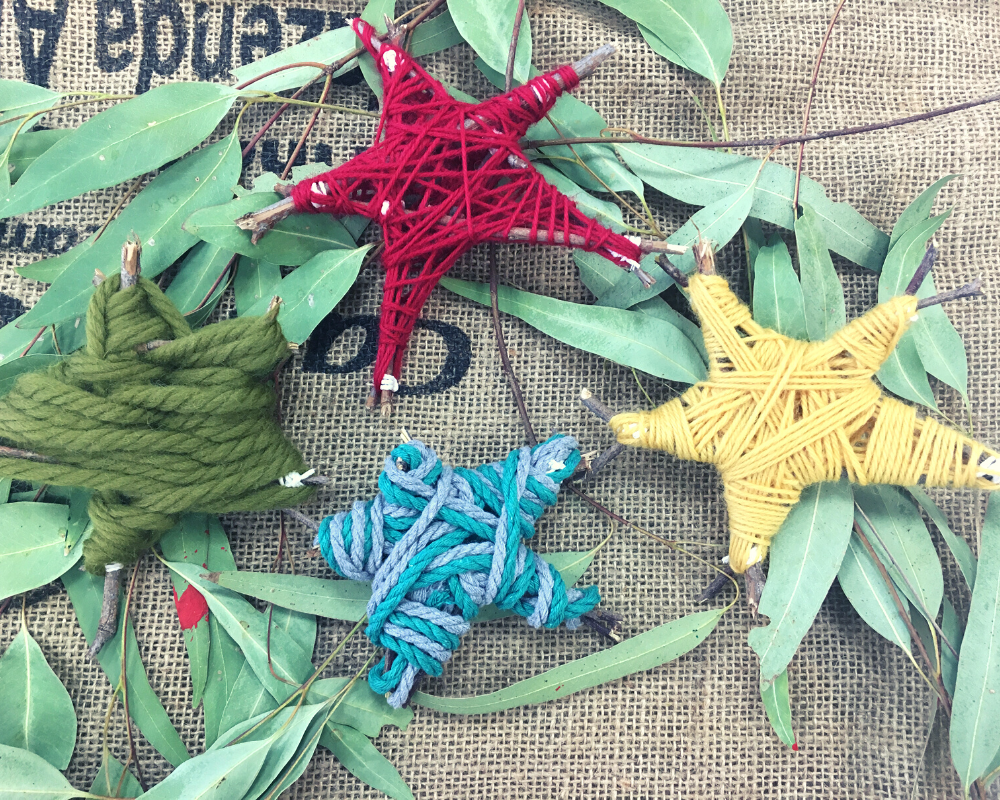
Stick Stars
With just a few sticks, and scraps of wool or craft cord, you can make some gorgeous (and unique!) star creations for the Christmas tree.
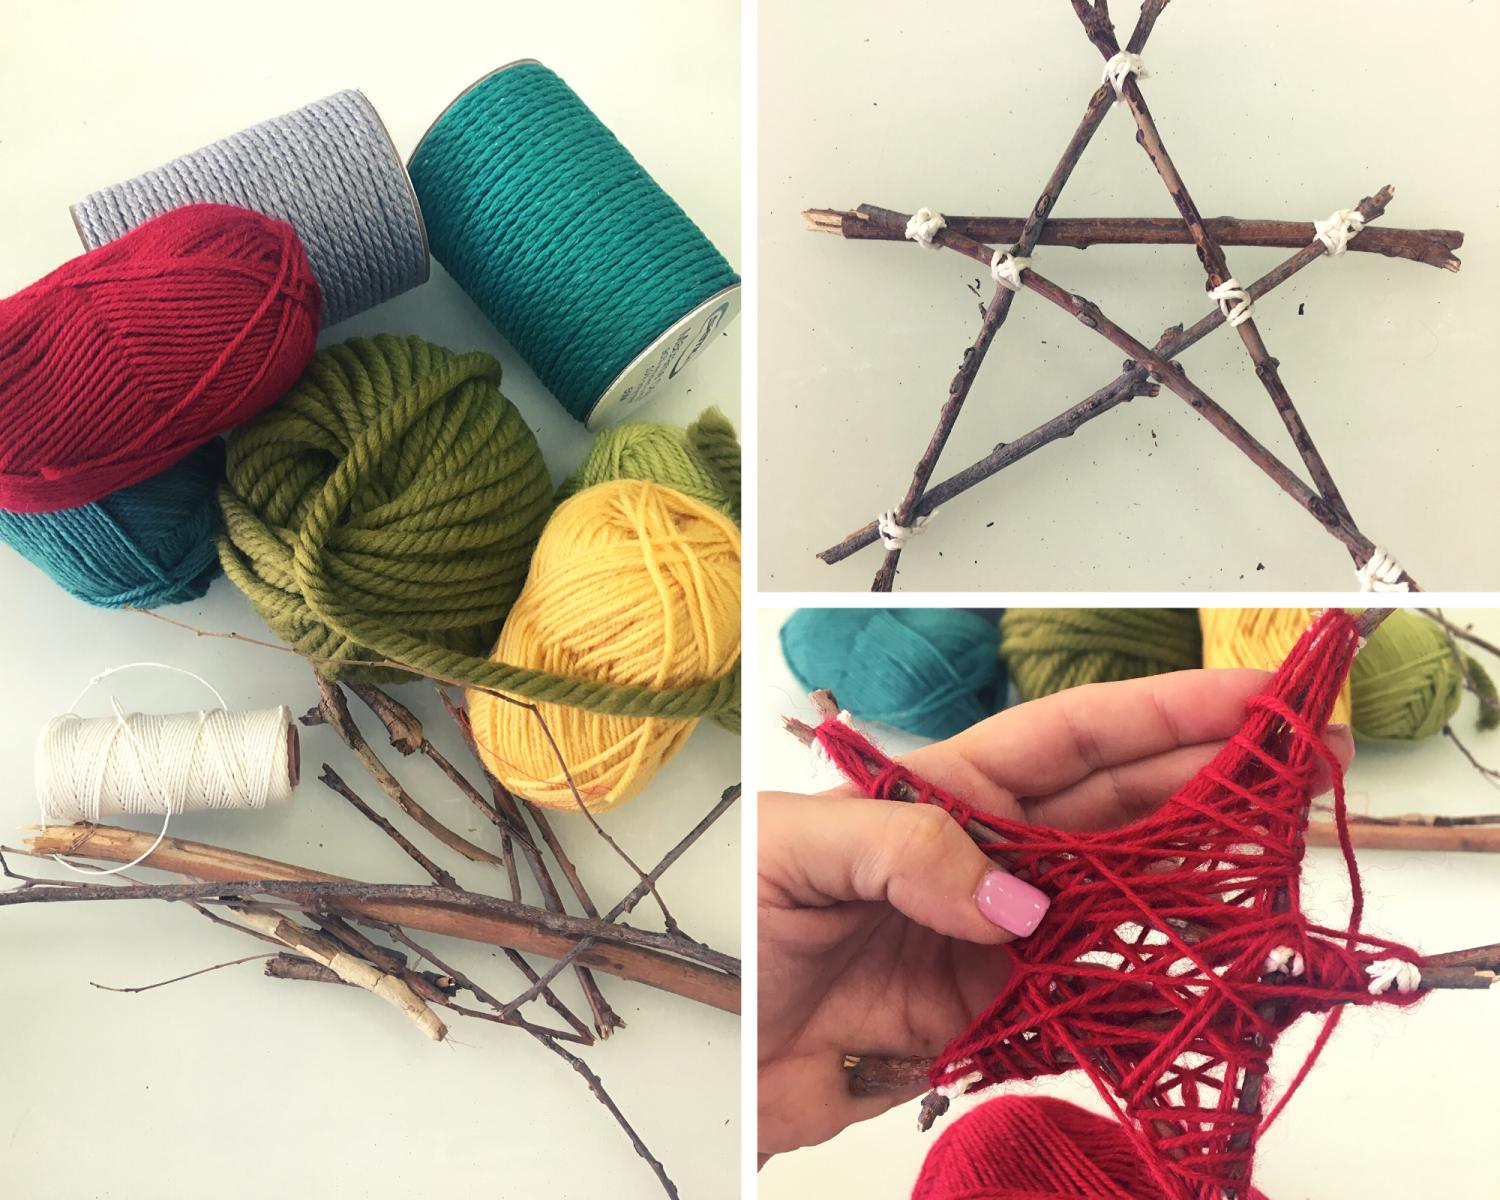
Materials:
- Sticks and twigs
- Hot glue gun and glue sticks, or twine/thread to join the sticks
- Brightly coloured yarn, wool or string
Method:
To create your star, take five sticks of equal length, arrange them in a star shape, and use either a hot glue gun, or string/cord to glue/tie the twigs together. We chose to tie them rather than use the hot glue gun, as we had a few small people at our crafting table. You could also glue them in advance, and have them ready to go for the weaving element.
We used a variety of yarns, including small and large ply wool, and macramé cord, but you could also use cross stitch thread, raffia or any string you have. The finer thread you use the more detailed your creation will be.
Once your design has as much, or as little, adornment as you want, simply tie off the thread and you’re done.
Nature (Glitter) Snow Globe
What better way to reuse empty glass jars than to upcycle them into gorgeous nature snow globes!

Materials:
- Clean glass jar with water-tight lid (small ones are better)
- Natural elements (flowers, leaves)
- Glitter
Method:
Take your natural elements (we used small bottle brush blooms and leaves) and place them inside your clean glass jar. We chose a small jam jar, as it takes less to fill, and isn’t too heavy for small hands to hold and swirl once completed.
Place flowers/leaves* into the jar, without packing them in too tightly, to allow good movement of water and glitter for maximum “snow” effect.
Add a good amount of glitter, the more the “merrier” your snow globe will be. The finer the glitter, the longer the “snowing” effect will last.
Fill the jar to the very top with cold water, place on the lid and twist it as tight as you can.
Tip it upside down to test water-tightness.
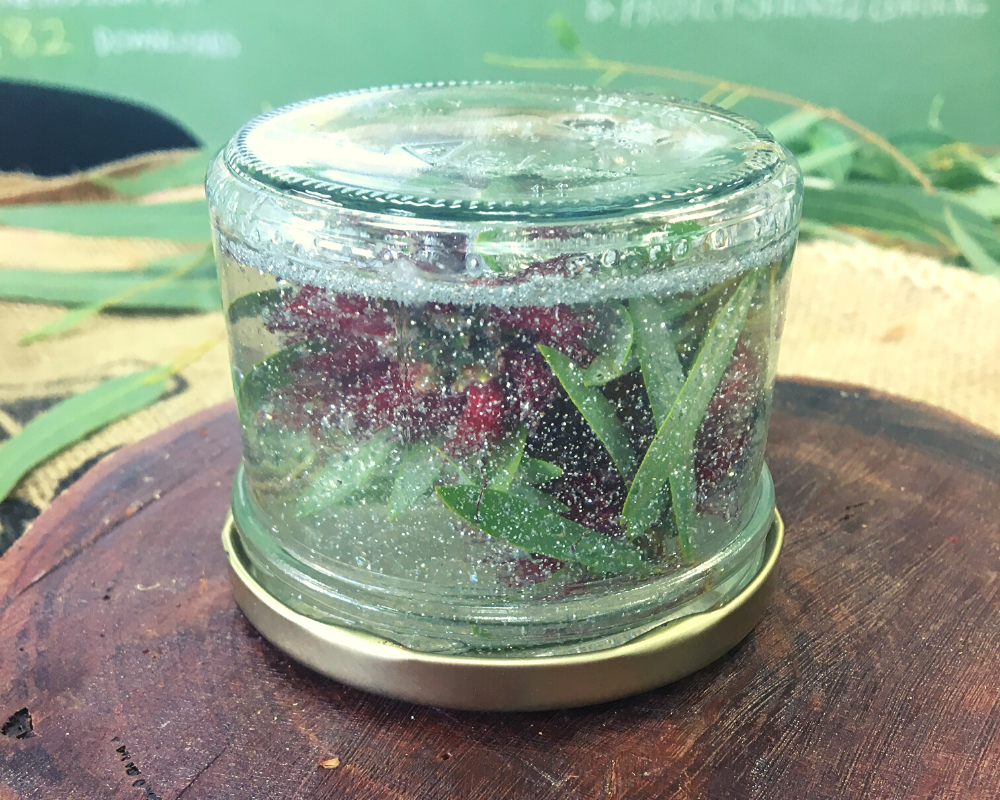
*Native flora lasts longer than other flowers, with up to four weeks of clear water and bright flowers before water starts to cloud.
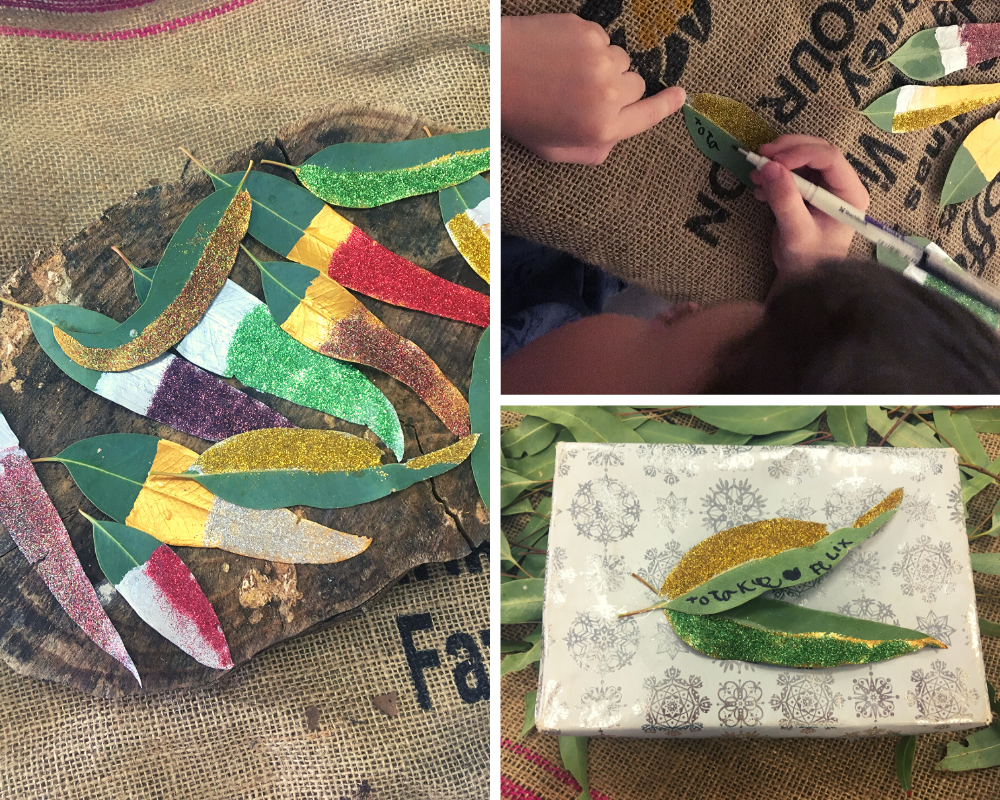
Gum Leaf Gift Tags
This one may just be our favourite Christmas craft of the year – they’re super simple to make, look gorgeous, and are a lovely keepsake for family members receiving them on their gifts.
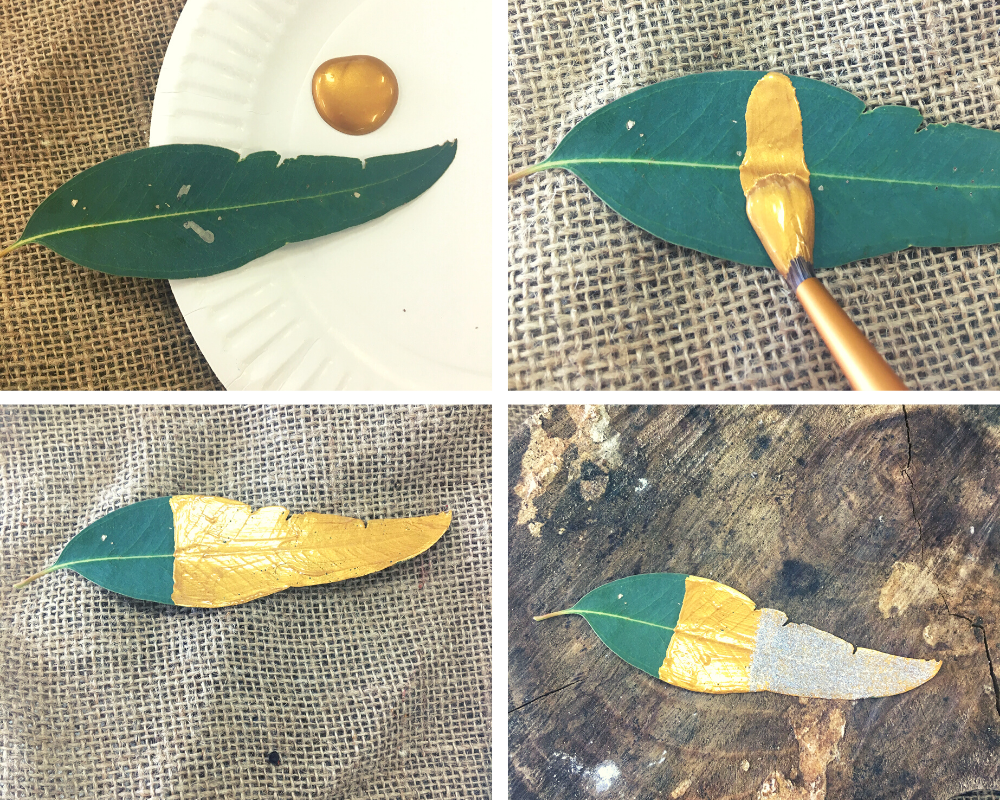
Materials:
- Flat, long leaves (we chose gum leaves)
- Brightly coloured paint
- Glitter (optional)
- Permanent marker
Method:
This one is pretty much plug and play! Paint your leaves, with as much or as little coverage as you like, and then add glitter while the paint is still damp. (If you don’t fancy vacuuming glitter up when the gifts are unwrapped on Christmas Day, maybe skip this step).
Allow to dry, and then write your message on your “tag”. Use a hole punch to pierce a hole in the leaf to attach to a gift with string, or use sticky tape.
Et voila! A simple, fun, eye-catching craft with a practical use for Christmas Day.
More Christmas crafting ideas
Why not revisit our blogs from Christmas past? We’ve made giant Christmas wreaths, rustic ornaments, woven nature Christmas trees, and DIY gifts in our Nature-Based Christmas Craft blog, and nature wrapping paper, painted Santa leaves, Santa sand men and painted Christmas rocks in our Merry and Bright Christmas Craft blog.
We’ve also compiled our list of Low-Cost Nature Based and Imaginative Christmas Gifts for Kids, that you can create and put together yourselves, to inspire creative, imaginative, outdoor play!